Preparing the spine of an old Bible is a crucial first step, it gives strength and durability to what you’re rebinding. You don’t want to skip this!
This post will go into more detail of how to prepare the spine before reattaching a cover to your Bible. Also, this post comes with a video to help you rebind your Bible today!
After you’re done. Please check out this blog post on how to make the cover.

This post contains affiliate links, which means I make a small commission at no extra cost to you. See my full disclosure here.
Is it possible to fix a Bible from home?
Before we jump into the process, I want to reassure you, that IT IS POSSIBLE to fix your Bible all by yourself! So, just be ready to try new things.
When I was learning I wish that I would have understood the importance of getting the bare bones ready and secured before tackling the process of making a cover (case). So, I wrote this blog for YOU!
You don’t need any special materials, but if you do want to purchase some tools I linked my top essential tools below.
If all you have is scissors, Elmer’s glue, a ruler, a paint brush, and a rag/paper… then you’re ready to go!
Things to Consider Before Beginning
- After each step that requires glueing make sure to add drying time of 30 mins – 1 hr minimum. This will ensure your glueing stays in place before moving on to the next step.
- Watch the whole video first, and then get your materials ready and prepped. This will keep you organized and calm.
- Practice on an old book or an old notebook.
- Have fun!
Helpful Tools to have before you begin a Book Repair
These are tools that I personally use and are linked to Amazon.
- Bone folder
- Sharp tool/blade
- End-bands
- Mull * I recommend one from Hollanders.com
- PVA Glue
- Tea! (ha-ha) stay hydrated
The Anatomy of a Book: Three parts to Consider
- The Binding of the Spine
Is it smyth sewn (bound) or perfect bound?
– Smyth sewn is when the paper/pages are stitched with needle and thread.
– Perfect bound is simply glue all over the spine to hold the pages in place.
- The Mull
– Traditionally books were reinforced with mull and attaching the textbloxk to the boards using sewing thread.
– If you don’t have mull a simple piece of light cotton frabric will do. You can also use paper.
- The Case/ Cover of the Bible
– This can either be a hardcover like textbooks or a softcover like paperbacks.
It’s important to understand the basics of book anatomy to make the process easier to understand.
Let’s get on to the first step.
Step 1, What is the condition of the Bible?
I like to examine every Bible first, it allows me to see where the problem really is.
Once you know the problem, you can see if what it needs is doable. This tutorial is for Bibles that have a good condition so let’s start there. Refer to the video for details.
You can find a Bible in three conditions:
- Good condition – The spine is intact.
- Okay condition – The spine has loose pages and some glue or stitching is loose.
- Bad condition – The spine has no binding, the pages are completely apart, it is split in half.
Step 2, Removing the Case Cover
If the case cover is still intact and hasn’t detached from the Bible (textblock) then you must remove it.
Removing it allows you to work on the spine and prepare it for a new cover. It’s scary to remove the cover, after all you want things to improve and this seems like a step backward.
BUT be assured that sometimes it has to get ugly first, before it gets pretty!
Please go to the section (Step 2) in the video to see exactly how to removed a cover.
You will need a blade to pull the cover of the textblock. Sometimes just pulling on the paper will do but it just depends how old the Bible is.
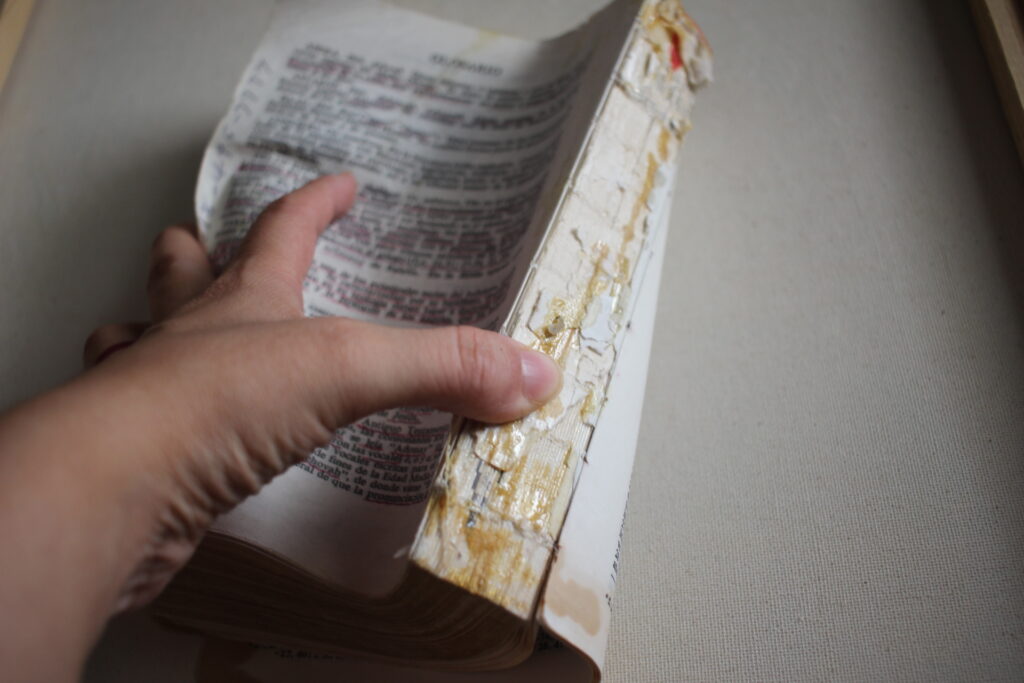
Step 3, Preparing the Spine
This step is the most involved. This is where you are truly getting your hands dirty.
It really consists of two parts:
- First you will gather all the materials. Mull (paper or cloth), scissors, Elmers glue or PVA, paint brush, pencil, endband and ribbon markers.
- Then, you will cut the mull (cloth or paper), cut ribbon markers, and cut 2 endbands. Then you will glue down the ribbons and endbands. Next, add a layer of glue to the spine and attach the mull (paper/cloth) making sure there are 2 flaps on each side. See video here.
Other examples to help you Rebind your Book!
I have another in depth tutorial on how to rebind a Bible. It has two colors on the cover and it takes you all into the rebinding process.
If you’re ready to fully jump in, check out this blog here. It also has videos and a lot more detail in writing and with images.
Thank you for being here.

10 Ideas for How to Decorate your Home When you’re Broke: Fall Inspired-No Spend tips!

Leave a Reply